Blender
DigitalSculpturesee also, topology
- Creating Blendshapes for facial animation https://cgi.tutsplus.com/tutorials/create-a-facial-animation-setup-in-blender-part-1--cg-32251
- Auto rig pro http://www.lucky3d.fr/auto-rig-pro/doc/#install
- Asset Manager http://www.pitiwazou.com/asset-management-documentation_us/
http://wiki.blender.org/index.php/Doc:Manual
BlenderKeys BlenderGameEngine BlenderHA BlenderAnimation BlenderRenderinghandy: File-->Extrenal Data--> Find missing files/Report missing files
- creating heighmaps for unity - http://wiki.blender.org/index.php/Doc:Tutorials/Textures/Maps/Creating_a_Heightmap_from_a_Plane
Curves
http://wiki.blender.org/index.php/Doc:Manual/Modelling/Curves
http://wiki.blender.org/index.php/Extensions:Py/Scripts/Manual/Wizards/TreeFromCurves
Written for the peach project, a tool to assist creating detailed tree's and bushes.
Layer Utility
http://www.fourmadmen.com/component/option,com_wrapper/Itemid,60/
http://www.fourmadmen.com/blender/scripts/4mm_layer_manager/screenshots/v13/menus.jpg
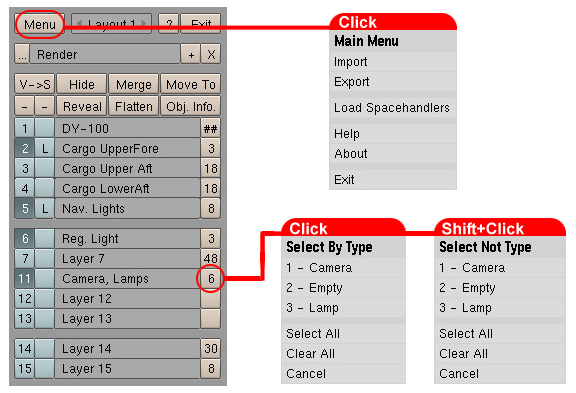
Lightmaps
BlenderLightmapTutorialMultiresolution Mesh
go to the Sculpt panel
in the Edit buttons click on make Multires
divide to about 6
enjoy.
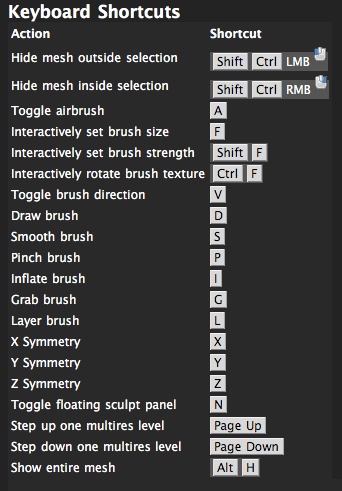
Sculpt/Retopo
ongelooflijk!
http://wiki.blender.org/index.php/Retopo
Material
Add a material and name it whatever you wish. Add a texture. In the Map Input tab, select UV. Then, in the texture buttons, load in the texture you want as an image.
Is alpha turned on in the Map To tab in the material buttons? Also, is ZTransp in the Mirror Transp tab turned on? (They both need to be in order for alpha to render.)
(i also had to change the blend more to Multiply in Map To but now the alpha renders excellently.)
Transparency
in various versions of blender: http://www.katsbits.com/tutorials/blender/scene-view-alpha-transparency.php
Navigation
Note: this is just the way I have it configured.
RMB = move 3d cursor
LMB = select
SHIFT + MMB = Rotate
MMB = Pan
MMB to Split window
SCROLLWHEEL to zoom
Scenes
CTRL + L to send object between scenes
then use the 'U' key to "make single user"
Viewports
1,3,5,7,9 use the CTRL key for the opposite view.
0 = camera / SHIFT+0 = selected object is the camera.
SHIFT + F to go into fly mode (while looking through camera)
LMB to go forward, MMB to go backward.
SPACEBAR to keep the orientation.
ESCAPE to cancel
SHIFT+V (in Edit Mode) = orient camera to selected.
Manipulating Objects
in all cases hitting X, Y, or Z constrains to axis and CTRL constrains to pretty increments
- G = move
- R = rotate
- S = scale / ALT+S = scale along normal
- Holding the CTRL key constrains the rotation to 5° increments
- Holding the SHIFT key allows you to choose more than one axis.
- Blender Creator has no innate concept of real-world units, so 1 "Blender Unit " can be considered equal to any size you like. When using your model in this template, however, 1 meter of your model should be equal to 1 Blender Unit.
- If you know the ratio of meters to the original units of the model, you can press the N key and type the scale factor into each of the SizeX, SizeY, and SizeZ number buttons.
- Holding the Shift key will allow you to select multiple objects. Pressing the B key will allow you to drag a selection box around objects. The A key will select or deselect all objects.
- H = hide / ALT+H = show
- P key in edit mode with vertexes selected SEPARATES the object.
Join objects CTRL-J
Separate objects P - L selects the whole object if you have a few verts selected already.
- ALT + D = Instance an Object
- SHIFT + D = Copy an Object
3d Cursor
- C Centers window on 3D cursor
- Shift-C Puts cursor on origin and window on home, Object, Edit
- Shift-S Calls up the Snap menu, Object, Edit
- LMB* Sets 3D cursor, 3D
Pivot Point
- hit F9 buttons
Centre, Centre New, Centre Cursor
center new will shift the pivot to the center of the geometry, center cursos will place the pivot where the 3D cursor is located.
Edge, Face, Vertex options
Notes:
switch between modes with CTRL + TAB + 1/2/3
- Lathe is called SWEEP
- convert a SubSurf into a normal mesh with ALT+C
- SHIFT + ALT + LMB = select loops!
- Ripping (splits along edge, vert, face) V key
- CTRL + ALT + RMB = drawing vertexes, faces, edges! draw a polygon by clicking points in space.
Edge
ALT + B = select edge loop
CTRL + E = mark seam for LSCM unwrap
CTRL + E = edge slide!
Face
Face Loop split = CTRL-R
Triangulate Polygon = CTRL-T
Flip Triangle = CTRL-F
Mesh (menu)/Faces/Convert tris to quads en omgekeerd -> CTRL-T, ALT-J
Vertex
- Weld vertices by selecting them in edit mode and pressing Alt-M.
- Linear Falloff = O (theres a pulldown where you can choose which kind)
- ALT + M = weld selected vertices.
Normals
The problem is that the normals are not all pointing outward. The solution is EASY:
- Select one mesh (showing this strange stripes effect)
- Enter edit mode (TAB)
- Select all vertices (AKEY)
- Recalculate the normals (CTRL+NKEY)
- Leave edit mode (TAB)
BlenderNormalMaps
Blender Gestures
- You can also enter Rotate mode by drawing a circular line.
- You can also enter scale mode by drawing a V-shaped line.
- You can also enter grab mode by drawing a straight line.
Duplidingen
to use dupliverts feature, parent the objects and turn it on.
SHIFT + CTL + A - KEY to make dupliobjects real.
Understanding Blender Dupliverts http://dev.newmediaworx.com/johnnyb/bplanet/tut_dupliverts.htm
Datablock
to replace one object with a different object without losing the original objects materials, animation, etc.
- with your mesh selected, go into edit buttons.
- in the 'Link and Materials' panel, it's the drop down menu in the top left. it begins with ME: YourObjectName
- select any other mesh object from the list that appears, and your currently selected object will use that mesh data instead.
- note, when you edit the mesh now, you will also edit at once any other objects that share this mesh data. this is because you are simply editing the datablock. The objects you see on your screen are simply users of the datablock. materials, animation curves, and many other entities in blender can be relinked in this manner. go the the outliner and choose show OOPs schematic to see a graphical representation of these relationships.