Quest3D
ReferenceStep 3 So now we have 1 object with 2 different UV sets and textures, to get them into Quest 3D we have to import the object 2 times, one time for the diffuser map and 1 time for the lightmap. So assign the diffuse map to you object with the correct UV set and export it to a .x file. Now assign the lightmap to the object with the correct UV set and export it. [edit] Step 4 Now we have 2 objects in Quest 3D 1 with the diffuse map and 1 with the lightmap. We are now going to copy the UV set from the lightmap object to the diffuse map object so we have 2 different textures and UV sets on 1 object. To do this go into object mode and control + click both objects. Now right click on 1 on the 2. Now select Channel Tools > Merge UV sets To make the surfaces easier to recognize I named them all ( RMB on the surface in object mode > Channel Properties) Make Sure the lightmap object is on the left, if not press “Swap <==>”. Now set the texture stage you are going to import the UV set to, to 2. To transfer the UV set, LMB on the Box surface in the left object/row then LMB on the same surface but in the right object/row. Now click on “Copy UV Selection =>”. Do the same for the plain surface. Now you can got to the second texture stage of the box surface and select UV set 1 and assign the lightmap texture. Under blender mode (advanced) put the Op to modulate. Do the same for the plain surface and we are finished, you can now remove the lightmap object.## 144
add trees to Forest Interface
Ophelia
- Ophelia Loader: Ophelia Dummy cam
- data: Characters: Ophelia: Ophelia Dummy Object
The Button
data/interface/Button.cgr
this is where the rollover for the buttons are.
Adding Powers
- import object
- open both folders
- rename the Motion to Matrix and the "body" to Material
- right click on both Matrix and Material and change them to "Parameter Channel"
- This should be either saved as an Asset unto itself of combined into another asset group.
Channelgroups to replace the pond land
- Ground2 asset
- Floor of Phase Two
- Floor Shadows (in 2 places, but don't do that!!)
UVs
- Ground2 asset -> Mapping: Planar Y, Scale 16 x 16
- Floor of Phase Two -> Mapping: Planar Y, Scale 2 x 2
Graveyard Editor
This is just for placement.
- Put the OD in Ename Grave Asset and Ename Stone Asset
- open Testcode/Data/Objects/Graveyard Editor
- select Grave to edit val and Stone to edit val located in the main channel group.
- in Animation section Sliders tab
- Slider Range should be number of days (40?)
- Add Restore button (which gives you 2 sliders)
- Anim/Object tab: select: ___Grave NULL Object and/or ___Stone NULL Object to move either a stone or a grave.
- in the sliders you can cycle through the graves
- in rotate mode (at the bottom) LOCK Pitch and Bank angles.
- Save Ename Graveyard Display when done!
Collision Objects
Collision objects are 1 meter underground and 3 meters tall.
In the case of the Ruin:
- click the collision object channel and click the button that says "Create Tree" if it takes too long then the cobject is too complex.
For the Trees
- Have the full project open then open up
Testcode > Engine > Objects > !TreeCollisionObject
and give it another name on import - Copy/Paste the new NP object
Delete the NP object you don't need anymore and reconnect. - In the OBJECT section find this !TreeCollisionObject Channelgroup
- Right click on body choose
Channeltools > Collapse Object - Take the 3d Object Data channel from the new Channel Group that was created from that action (its at the top of the list in the project tree)
- Save !TreeCollisionObject and tell Michael you have done so, so he can test it and put it in the engine group.
Nature Painter
[::NaturePainter]
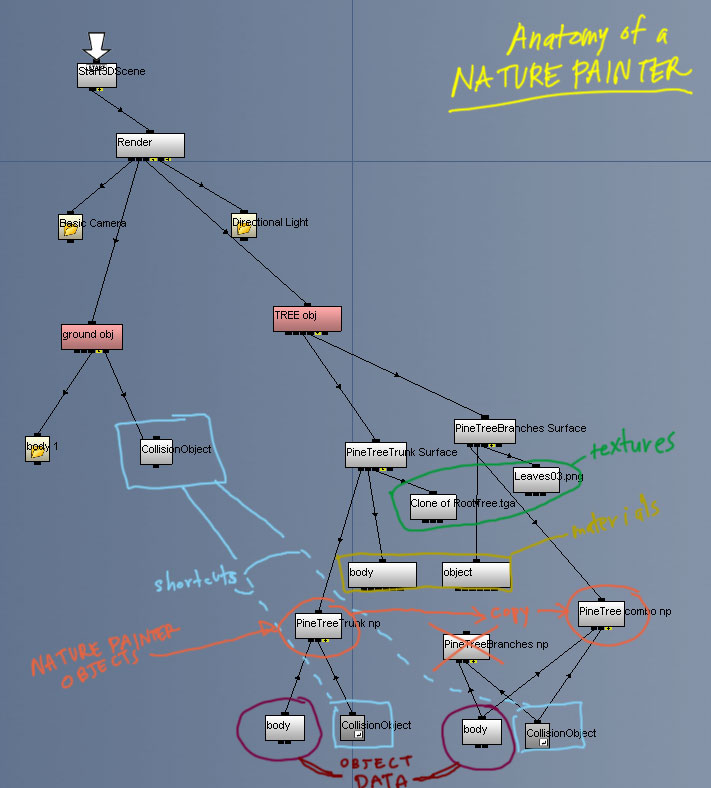
It was alot simpler than I thought to understand this. Basically just import the Objects as normal.
- Adjust the Material settings first (objects become connected to the NP way of working and you won't see them in the object view once you hook them up.)
- Since we don't need to move these Objects around delete the Motion channels.
- Open the two remaining folders and hook up the contents to the NP channel.
- Make sure to label everything (put the Object Type as suffix) or else you won't be able to find it in the NP list later.
- Connect the 3D Object channel (the orange one) to the Render channel, or you wont see it in the NP window. Find it by searching for the name of some other obj channel you know is hooked up (a blue one) Or it might be in the cgr called Forest of Phase One. Click on the object to bring up a list and rearrange the draw order.
The trick is to paint the trunks first and then copy/paste that NP channel and connect the Object Data from the leaves. This ensures that when you use random to paint on the ground all the matrices are in the same place. Just remember that if you make changes/add more trunks that you need to re-copy/paste/hook-up the trunk's NP channel.
Ground Multi-Texture
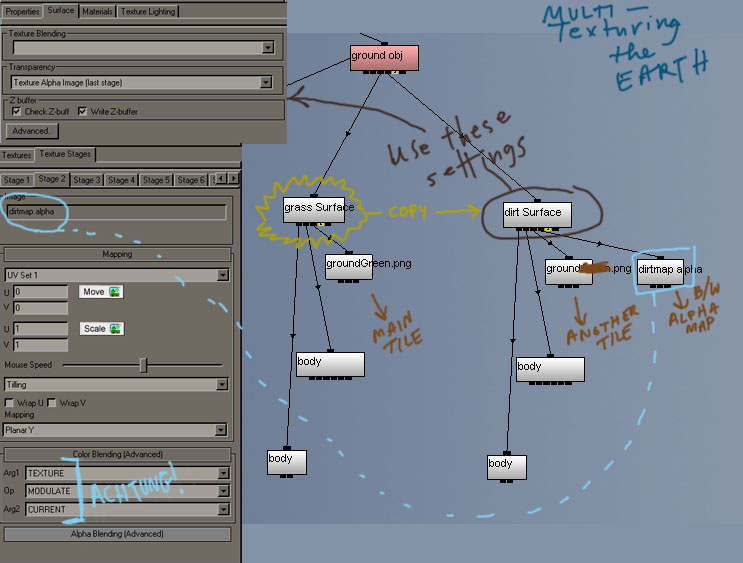
- Copy the ground Surface and its children together with it (SHIFT+click copy/paste)
- Make sure to label the Surfaces or you won't be able to tell the differences in Object view
- copy one texture channel for loading the alphamap (alphas must be .jpg format) in the texture channel Load a blank white .png and then Load Alpha the .jpg
- Object View: inside the ground Object will be two Surfaces. Leave the one with the main tile alone. For the alphamapped Surface add a 2nd Texture Stage under "Mapping" choose "UV Set 1" there will be a pop-up... Let it generate a new UV map with Planar Y mapping. Then use the settings in the screenshot. It should work.
Importing (obsoleted method)
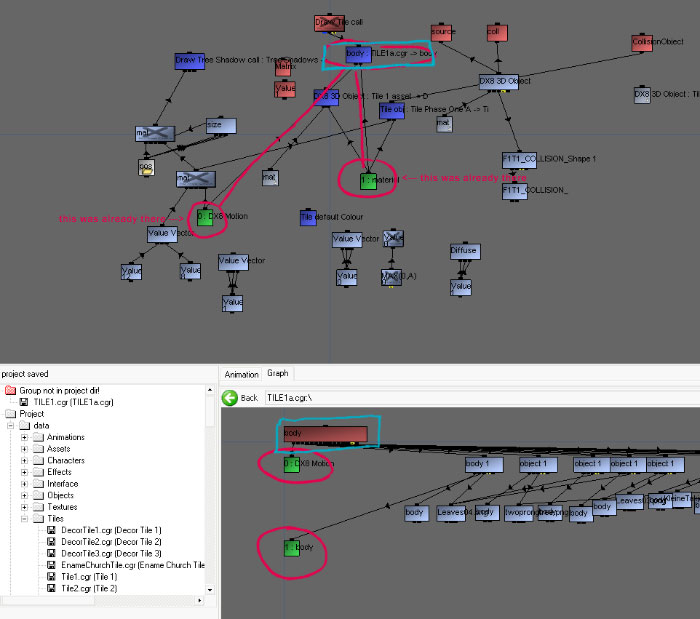
- turn the motion into a parameter channel
- Open each folder that hangs off of the DX8 3D Object (body)
- turn the first DX8 Material into a parameter channel and remove all the other materials.
(the materials are the longest ones with all the little chupkins at thhe bottom) - select the Tile you want to replace (from the Tiles folder) open it in another window
- connect the object to the caller of any tile group that is in the game. (it turns blue)
- you are replacing the Object so...
- reconnect the children.
!TestLoader.cgr --> replace the tiles in the main data folder
for the lighting
make sure you have removed all the materials except the first one. it becomes a peramenter channel which adds another chupkun to 'body' attach the material.
select everything in the channel group!!
then
in Object/Texture
TEXTURE
MODULATE
CURRENT
in Color blending AND in Alpha Blending
&&
Surface --> Advanced --> Reject Alpha Pixels